Contents
Is it true that quick action can greatly reduce the damage caused by water? When disaster strikes, every moment counts, and knowing the right steps to take can make all the difference. From ensuring your safety to effectively extracting water, understanding the process is vital. If you want to protect your property and belongings, you’ll need to know the essential tips that can guide you through this challenging situation.
Key Takeaways
- Shut off electricity and gas to prevent hazards before starting water extraction.
- Use wet/dry vacuums or pumps to promptly remove standing water from affected areas.
- Wear protective gear to safeguard against contaminants during the extraction process.
- Utilize fans and dehumidifiers for effective drying after removing water.
- Install moisture barriers and conduct regular maintenance checks to prevent future water damage.
Assess the Extent of Water Damage
Before you start any repairs, it is vital to assess the extent of water damage to determine the necessary steps for effective remediation. Begin by inspecting the affected areas, looking for signs like discoloration, mold, or structural instability. Document the damage thoroughly; this water damage assessment will be significant for both your repair strategy and any insurance claim considerations. Take photos and note the dimensions of damaged spaces, as these details can substantiate your claim and expedite the process with your insurer.
Next, check for hidden damage behind walls or under flooring, as moisture can easily linger unnoticed. Use a moisture meter if available to gauge water levels accurately. This all-encompassing evaluation not only helps in planning your repairs but also guarantees you’re well-equipped to communicate the extent of the damage to your insurance provider. Remember, a thorough assessment lays the foundation for successful remediation and restoration efforts.
Ensure Safety First
Before you start any water extraction, assess potential hazards in the area, such as electricity or contaminated water. Make certain you’re wearing appropriate protective gear, including gloves and masks, to safeguard against health risks. Finally, guarantee proper ventilation to minimize exposure to dampness and harmful mold spores while you work.
Assess Potential Hazards
When evaluating potential hazards in a water-damaged environment, it is crucial to prioritize safety to protect yourself and others. Begin with a thorough hazard evaluation to identify dangers like slippery surfaces, electrical risks, and contaminated materials. Conducting this evaluation not only helps you spot immediate threats but also informs your risk management strategies.
Make sure to check for structural damage and signs of mold growth, which can pose long-term health risks. If you’re unsure about the safety of an area, err on the side of caution and seek professional advice. By evaluating these hazards upfront, you create a safer environment for yourself and your team, fostering a sense of community and responsibility in the recovery process.
Wear Protective Gear
After evaluating potential hazards, the next step is to wear protective gear to secure your safety while working in a water-damaged environment. Start by donning appropriate protective clothing, which may include waterproof boots, gloves, and a durable suit. This clothing shields you from potential contaminants and prevents slips. Don’t forget to wear safety goggles to protect your eyes from splashes and debris. It’s critical to ascertain your gear fits well and allows for ease of movement while providing full coverage. By prioritizing safety through protective gear, you not only safeguard yourself but also foster a sense of responsibility within your team. Remember, taking these precautions reflects your commitment to a safe working environment for everyone involved.
Ensure Proper Ventilation
As you tackle water damage, ensuring proper ventilation is essential for maintaining a safe working environment and preventing further issues. Effective air circulation helps reduce humidity levels, which can minimize mold growth and promote faster drying. You can use various ventilation methods to enhance airflow.
Here’s a quick reference table to guide you:
| Ventilation Method | Description |
|---|---|
| Open Windows | Allows fresh air to circulate |
| Use Fans | Increases airflow in affected areas |
| Dehumidifiers | Reduces moisture levels in the air |
| Exhaust Vents | Directs damp air outside |
| Air Movers | Enhances circulation in confined spaces |
Shut Off Electricity and Gas
Before you begin any water extraction efforts, it’s important to prioritize safety by shutting off electricity and gas to the affected area. Start by locating your main electrical panel. Flip the main breaker switch to off, ensuring that you’re protected from any electrical hazards caused by water exposure. Remember, practicing electrical safety is fundamental in these situations.
Next, locate your gas shutoff valve, typically found near your gas meter. Turn it off by rotating the valve handle clockwise until it stops. This prevents any potential gas leaks that could pose serious risks during the extraction process.
Always wear rubber-soled boots and gloves when handling electrical appliances or gas fixtures, as they provide insulation against shocks. By taking these steps, you’re not only safeguarding your health but also creating a secure environment for effective water extraction and repair efforts. Your safety is paramount—don’t overlook these critical precautions.
Remove Standing Water Promptly
Once you’ve confirmed the area is safe, it is crucial to remove standing water promptly to prevent further damage and reduce the risk of mold growth. Start by evaluating the amount of standing water; this will help you choose the right extraction techniques. For small amounts, using a wet/dry vacuum can be effective. If there’s a significant volume, consider using a pump to expedite the process.
As you extract the water, focus on areas where moisture tends to accumulate, like corners and under furniture. Make sure to wear protective gear, including gloves and boots, to safeguard against contaminants. After you’ve removed the bulk of the standing water, continue to dry the area with fans and dehumidifiers, as lingering moisture can lead to mold. Remember, acting quickly not only protects your property but also creates a safer environment for you and your loved ones.
Use High-Quality Water Extraction Equipment
After removing standing water, using high-quality water extraction equipment greatly enhances your efforts to mitigate damage. Investing in high-efficiency pumps guarantees you can remove excess moisture quickly and effectively, reducing the risk of mold and structural issues. These pumps are designed to handle large volumes of water, making them ideal for significant flooding situations.
In addition to pumps, portable extractors are invaluable tools for tackling smaller areas or hard-to-reach spots. Their mobility allows you to maneuver easily around furniture and tight spaces, guaranteeing that you extract water from every corner of the affected area.
When you choose top-tier equipment, you not only speed up the recovery process but also improve the overall effectiveness of your water extraction efforts. Remember, the right tools can make a significant difference in restoring your space and guaranteeing a safe environment for you and your loved ones.
Dry Out Affected Areas Thoroughly
To effectively prevent further damage and mold growth, it is vital to dry out the affected areas thoroughly as soon as possible. Implementing proper drying techniques is important. Here are three steps to guide you:
- Use Fans and Dehumidifiers: Position fans to circulate air and place dehumidifiers to extract moisture from the air.
- Check Moisture Levels: Regularly monitor moisture levels with a hygrometer to verify you’re on track for complete dryness.
- Remove Wet Materials: If possible, remove soaked carpets, drywall, or furniture to speed up the drying process.
Address Mold and Mildew Prevention
To effectively prevent mold and mildew, you need to establish a regular cleaning schedule that targets damp areas in your home. Implementing proper ventilation techniques will also help reduce moisture levels, making it harder for mold to thrive. Additionally, consider installing a moisture barrier in vulnerable spaces to provide an extra layer of protection against water intrusion.
Regular Cleaning Schedule
While it might be easy to overlook, establishing a regular cleaning schedule is essential for preventing mold and mildew growth in your home. By committing to a routine, you can create a healthier living environment for you and your loved ones. Here are three key practices to include in your schedule:
- Weekly Cleaning: Use effective cleaning products to wipe down surfaces in bathrooms and kitchens, where moisture tends to accumulate.
- Monthly Deep Clean: Tackle less visible areas like behind appliances and inside cabinets to eliminate hidden mold spores.
- Scheduling Reminders: Set reminders on your phone or calendar to keep your cleaning routine consistent and on track.
Proper Ventilation Techniques
Regular cleaning alone isn’t enough to combat mold and mildew; proper ventilation techniques play an essential role in maintaining a healthy indoor environment. To enhance air circulation, consider using exhaust fans in bathrooms and kitchens. These ventilation methods help expel humidity and prevent moisture buildup. Opening windows when the weather allows also promotes fresh air flow, reducing stagnant conditions where mold thrives.
Additionally, using dehumidifiers can effectively lower indoor humidity levels. Make certain that vents aren’t blocked by furniture or other objects, allowing for peak air movement throughout your home. Regularly inspect and clean your HVAC systems to make certain they function efficiently. By implementing these proper ventilation techniques, you’ll create a welcoming space that fosters well-being and minimizes the risk of mold and mildew growth.
Moisture Barrier Installation
When installing a moisture barrier, you’re taking an essential step in preventing mold and mildew growth in your home. To guarantee effective installation, follow these key techniques:
- Choose the Right Moisture Barrier Materials: Use polyethylene sheeting or specialized waterproof membranes to create a solid barrier against moisture.
- Prepare the Surface: Clear the area of debris and verify it’s dry before laying down the moisture barrier. This helps in achieving a tight seal.
- Seal the Joints: Use appropriate tape or sealant to secure seams and edges. This prevents moisture from seeping through and keeps your space protected.
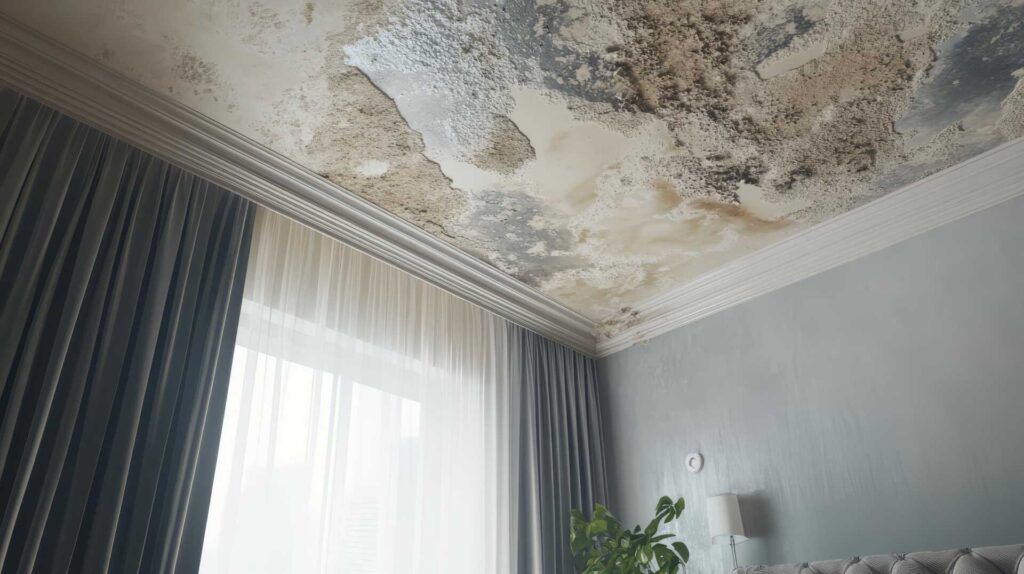
Repair Structural Damage
As you assess the impact of water damage on your property, addressing structural damage promptly is essential to maintaining safety and integrity. Neglecting this can compromise your home’s structural integrity, leading to more significant issues down the road. Here are some effective repair techniques to evaluate:
| Damage Type | Repair Technique | Tools Needed |
|---|---|---|
| Cracked Walls | Inject epoxy | Epoxy kit, putty knife |
| Sagging Ceilings | Reinforce with braces | Wood braces, screws |
| Warped Floors | Replace damaged boards | Pry bar, replacement boards |
| Mold-Infested Areas | Remove and treat | Mold cleaner, gloves |
| Foundation Issues | Seal cracks and gaps | Hydraulic cement, trowel |
Restore Personal Belongings and Valuables
Restoring personal belongings and valuables after water damage can be a challenging task, but it’s crucial to act quickly to minimize loss. Follow these key steps for effective personal item restoration and sentimental value preservation:
- Assess Damage: Carefully evaluate each item for water exposure. Determine if it’s salvageable or needs to be discarded.
- Clean and Dry: Use soft cloths to gently wipe off excess moisture. For electronics, consult a professional before attempting any cleaning.
- Store Properly: Keep items in a dry, well-ventilated area. Use acid-free boxes for photographs and documents to protect them during the drying process.
Implement Long-Term Water Damage Prevention Strategies
To protect your home from future water damage, start with regular maintenance checks to identify potential issues early. Additionally, make certain your drainage systems are functioning properly and redirect water away from your foundation. Finally, seal vulnerable areas, such as windows and doors, to minimize the risk of leaks and moisture intrusion.
Regular Maintenance Checks
Regular maintenance checks are essential for preventing long-term water damage in your home. By committing to routine inspections, you can identify potential issues before they become costly repairs. Here’s a quick checklist to guide your preventive maintenance efforts:
- Inspect plumbing fixtures: Regularly check for leaks, corrosion, or signs of wear in faucets, pipes, and hoses.
- Examine your roof: Look for damaged shingles or debris that could trap water and cause leaks.
- Check gutters and downspouts: Verify they’re clear of debris to prevent overflow and water accumulation around your foundation.
Proper Drainage Systems
Effective drainage systems are vital in safeguarding your home from water damage. To achieve this, you should focus on proper drainage design that directs water flow away from your foundation. Begin by evaluating your landscape; sloping your yard away from your home can greatly reduce water pooling. Installing gutters and downspouts is important; make certain they direct water at least three feet away from your property. Regularly clean gutters to prevent clogs that can lead to overflow. Additionally, consider permeable pavement and drainage trenches to manage excess water effectively. By implementing these strategies, you not only enhance your home’s resilience against water damage but also contribute to a welcoming, safe environment for you and your loved ones.
Seal Vulnerable Areas
While it might seem easy to overlook small cracks and gaps around your home, sealing these vulnerable areas can considerably reduce the risk of water intrusion. By implementing effective sealing techniques, you not only protect your investment but also create a more comfortable living environment.
Here are three essential steps to get you started:
- Inspect Regularly: Check for cracks in walls, around windows, and along foundations. Address any issues promptly.
- Use Waterproof Coatings: Apply high-quality waterproof coatings to surfaces prone to moisture, such as basements and exterior walls.
- Seal Gaps: Utilize caulk or foam sealants to fill small gaps and prevent water from entering.
Recap
In summary, tackling water damage isn’t just a task; it’s a heroic battle against the relentless forces of nature! By acting fast and following these essential tips, you’re not only salvaging your property but also preventing future catastrophes that could turn your home into a swampy disaster zone. Remember, the stakes are high, but with diligence and the right approach, you can emerge victorious, ensuring your sanctuary remains a safe haven for years to come!
Recent Posts
What Are Key Dehumidification Techniques for Smoke Damage?
Smoke damage isn’t just about the charred surfaces; it often leaves behind considerable moisture that
Why Use Dehumidification for Smoke Damage Cleanup?
Smoke damage can linger long after the flames are extinguished, leaving behind residues that are
Top 3 Tips for Structural Drying After Water Damage
When faced with water damage, effective structural drying is vital to prevent further issues like