
Contents
For water damage, you need to trace the source fast, verify safety before you enter, and inspect both visible and hidden moisture with the right tools. Stains, warping, and odor can point to deeper problems, but the real question is how far the damage has spread—and what you should remove before it gets worse.
Key Takeaways
- Identify the water source by tracing leaks, stains, and moisture to the highest wet point.
- Check for safety hazards first, including electrical risks, structural damage, and gas odors.
- Inspect visible damage for stains, warping, swelling, soft spots, and discoloration.
- Use moisture meters or infrared cameras to find hidden dampness in walls, floors, and trim.
- Document all damage with photos, notes, dates, and readings for repairs and insurance.
Identify the Water Source
Before you can assess water damage, you need to identify where the water came from, because the source determines both the extent of the damage and the risk of contamination.
Start with leak detection at fixtures, supply lines, roofs, windows, and appliances, then trace visible staining to the highest wet point.
Use moisture measurement on walls, floors, and trim to confirm active migration and map the affected area.
Compare readings in adjacent materials so you can separate a localized issue from a broader failure.
If you find clean water, treat it differently than sewer-backed or storm-related intrusion.
Document the source, path, and current condition, so you and your team can plan the next steps with confidence and stay aligned on the scope.
Check Safety Before Entering
Even if the source looks minor, you need to verify the area is safe before you go inside. Stop and assess for electrical hazards, structural instability, gas odors, and contaminated water.
If you notice sparking, sagging ceilings, cracked walls, or a strong chemical smell, stay out and call professionals.
Put on safety gear before entry: boots, gloves, eye protection, and a mask if airborne debris or mold may be present.
Keep your phone charged, and tell someone where you’re going. Follow your emergency procedures, including shutting off utilities only if you can do so safely.
Move carefully, keep exits clear, and don’t rush to join the rest of your team until you’ve confirmed the space won’t put anyone at risk.
Inspect Visible Water Damage
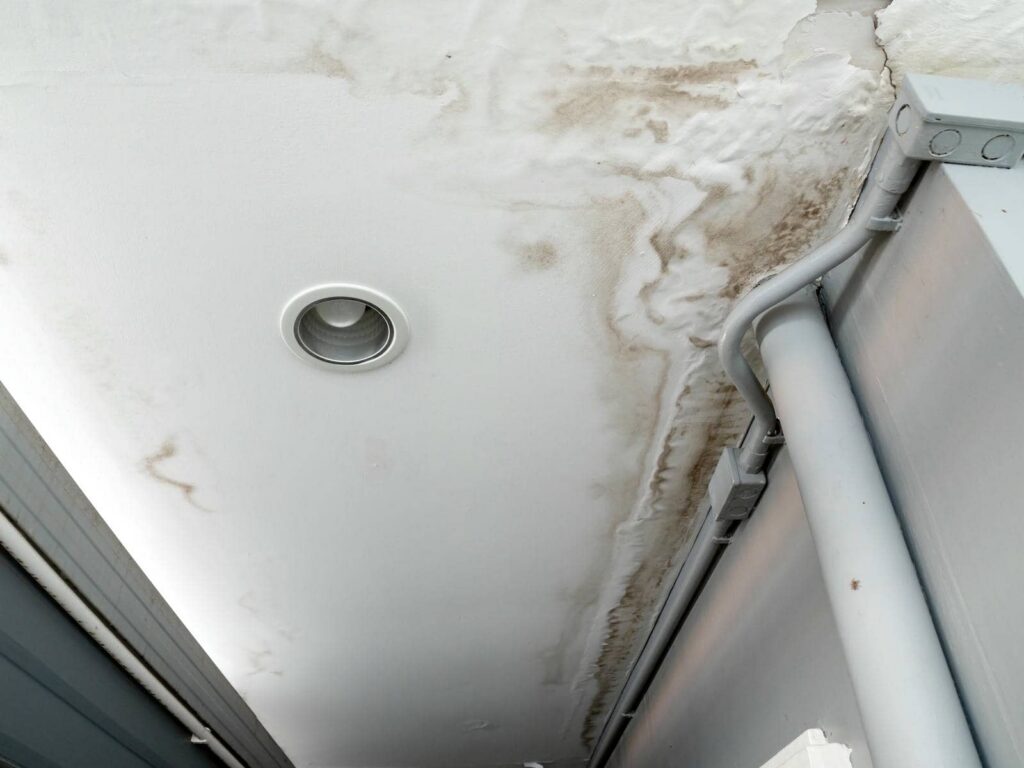
Inspect visible surfaces for stains, discoloration, and waterlines that indicate moisture exposure.
Check walls, ceilings, floors, and trim for warping, swelling, or soft spots, since these changes often show material saturation.
Document each affected area so you can judge the extent of damage and plan repairs accurately.
Check Stains and Discoloration
Look for stains, rings, and discoloration on walls, ceilings, floors, and baseboards, since water often leaves a visible trail long after the leak stops. You can compare stain types to narrow likely discoloration causes and decide where to inspect next.
Dark edges, yellow-brown halos, and pale patches each point to different moisture paths. Stay methodical so you and your team share the same read on the damage.
- Check fresh marks versus old, set-in stains.
- Note whether edges are crisp or diffuse.
- Compare affected areas with nearby clean surfaces.
- Photograph each spot for later review.
If you find recurring staining, trace the source above or behind the surface. Clear observation helps you stay confident, informed, and connected with others handling the assessment.
Note Warping and Swelling
Warped panels and swollen trim often signal that water has soaked into the material and changed its shape. You should inspect floors, baseboards, cabinets, and drywall for edges that cup, buckle, or lift away from adjoining surfaces.
Press lightly; if the surface feels soft, spongy, or uneven, water absorption may have begun to weaken the structure. Compare both sides of the damaged area so you can tell whether the distortion is localized or spreading.
Look for gaps at seams, sticking doors, and misaligned joints, since these often confirm material deterioration. If you notice fresh swelling, document it and monitor the area closely.
You’re not alone in this process; careful observation helps you and your team catch hidden damage before it gets worse.
Find Hidden Moisture
Even when surfaces appear dry, water can hide inside wall cavities, under flooring, and behind baseboards, so you’ll need to check for dampness in less obvious places.
Use moisture meters to compare readings across affected and unaffected areas, and scan with infrared cameras to spot cooler zones that may signal trapped water. You’re not guessing; you’re confirming patterns that guide your next steps.
- Probe trim edges and door casings.
- Lift a corner of carpet to test padding.
- Inspect plumbing penetrations and exterior corners.
- Record readings so your team can track changes.
Move methodically and trust your tools.
When you identify hidden moisture early, you protect the space, stay aligned with your crew, and avoid missing damage that’s still active.
Check for Mold and Structural Damage
Once you’ve mapped hidden moisture, inspect the same areas for mold growth and structural compromise before you begin repairs.
Look closely at drywall, baseboards, insulation, subfloors, joists, and framing for discoloration, musty odor, swelling, soft spots, or visible colonies. If you see fuzz, staining, or warped materials, treat the area as contaminated and limit airflow to prevent spores from spreading.
Probe wood with a screwdriver to test for rot and check load-bearing members for sagging, cracking, or movement. Protect structural integrity by removing only damaged materials you can safely access.
For mold prevention, dry affected surfaces quickly and keep indoor humidity low. If damage seems extensive, bring in a qualified inspector so you’re not facing the cleanup alone; you deserve a safe, stable space.
Document the Damage for Repairs and Insurance
Before you remove or repair anything, document every affected area with clear photos, videos, and written notes. You’ll create a reliable record for insurance claims and repair estimates, and you’ll help your team stay aligned.
Photograph each room from wide and close angles.
Record dates, times, and visible water sources.
Note stains, swelling, odors, and appliance readings.
Save copies in cloud storage and a shared folder.
Use a ruler or coin in images to show scale, and keep your notes factual, not speculative. Label files by room and damage type so you can retrieve them fast when adjusters or contractors ask.
A complete record reduces disputes, speeds decisions, and keeps your recovery process organized and professional.
Decide What to Dry, Remove, or Replace
Sort the affected materials into three actions: dry, remove, or replace.
You should dry clean, nonporous items that haven’t absorbed contaminated water, using targeted drying techniques like air movement, dehumidification, and controlled heat.
Remove porous materials that stayed wet for more than 24 to 48 hours, including carpet padding, insulation, and swollen drywall, because they can harbor mold.
Follow removal guidelines for any item with sewage, visible decay, or structural loss.
Replace materials that’ve delaminated, warped beyond repair, or lost strength, such as particleboard and saturated ceiling panels.
Check hidden cavities, too, so you don’t trap moisture behind surfaces.
If you stay systematic, you’ll protect your home and keep your crew confident, aligned, and ready for the next step.
Frequently Asked Questions
How Quickly Should Water Damage Be Assessed After Flooding?
You should assess water damage within 24 hours after flooding. Your flood response should start immediately, and you’ll reduce hidden structural issues by completing a prompt damage assessment and documenting affected materials.
What Tools Help Detect Moisture Behind Walls?
You’ll use moisture meters and thermal imaging to detect hidden dampness behind walls. You’ll also check hygrometers and borescopes, compare readings, and confirm suspicious areas so your team acts quickly and belongs to informed professionals.
How Do I Estimate Repair Costs Accurately?
You’ll estimate repair cost accurately by combining a thorough damage assessment, contractor bids, and material pricing; don’t guess, because precision protects your budget and keeps you aligned with others facing the same repair challenge.
When Should a Professional Restoration Company Be Called?
Call a professional restoration company when damage is extensive, hidden, or sanitary risks exist. You’ll use prevention techniques, avoid restoration myths, and protect your property faster by acting immediately after leaks, floods, mold, or sewage exposure.
Does Homeowners Insurance Cover All Water Damage?
No, homeowners insurance doesn’t cover all water damage. You’ll need to review policy exclusions carefully; a storm surge can shatter assumptions. For flood insurance, you’re often protected only if you’ve bought separate coverage.
Wrap-Up
When you assess water damage, act fast and stay safe. One burst pipe can release up to 6 gallons per minute, turning a small leak into major loss within hours. You should trace the source, inspect visible damage, use moisture readings, and check for mold or structural problems. Then document everything with clear photos and notes. Careful assessment helps you decide what to dry, remove, or replace, and it supports faster repairs and stronger insurance claims.
Recent Posts
Essential Guide to Flood Damage Restoration Practices
Flood Damage Restoration begins with a fast, organized response to minimize structural damage and protect
Top 10 Flood Damage Restoration Best Practices
Damage Restoration starts with a fast, organized response to minimize property damage and prevent long-term
7 Essential Tips for Flood Damage Restoration
Flood Damage Restoration should begin as soon as it is safe to enter the property,