Contents
Many homes face a water damage emergency every day, and you can’t rely on surface cues alone. You should check moisture levels with a meter, compare readings in affected and unaffected areas, and use thermal imaging to spot hidden dampness behind walls. Then document every defect with clear photos and notes. These three steps give you a practical damage map, but one of them often reveals more than the others.
Key Takeaways
- Identify the water source, affected materials, and contamination level to judge the type and severity of damage.
- Photograph stains, warping, and delamination from multiple angles, and record dates, locations, and inspection notes.
- Use a moisture meter to compare affected and unaffected areas and detect hidden saturation in walls, floors, and baseboards.
- Add thermal imaging to find cooler, damp areas and trace water migration behind surfaces and inside wall cavities.
- Document findings carefully to support repair planning, insurance claims, and targeted restoration decisions.
How to Assess Water Damage
Start by identifying the water source, the affected materials, and the extent of saturation so you can judge the damage accurately.
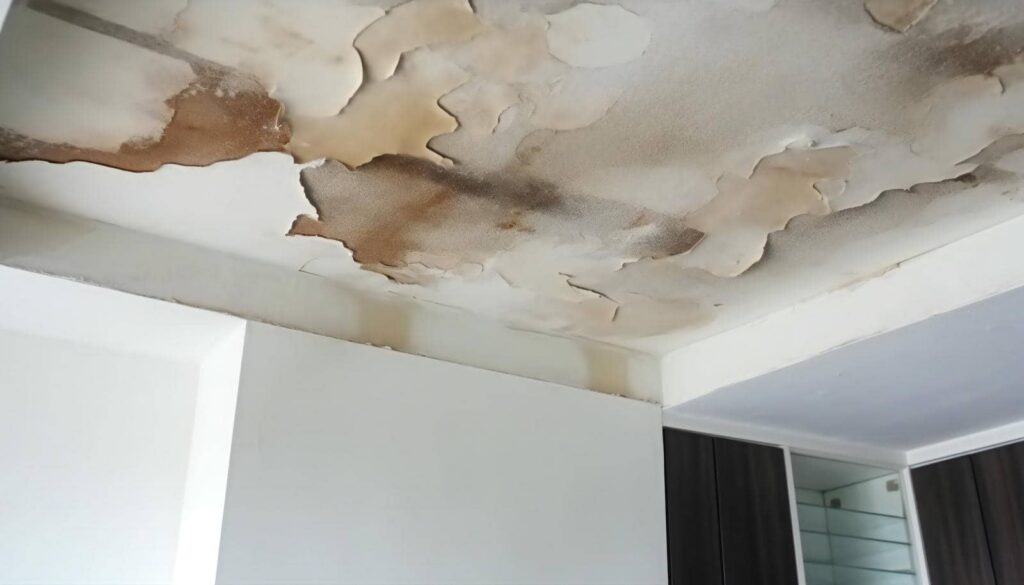
You should document visible stains, warping, swelling, and delamination on drywall, flooring, trim, and insulation.
Then trace the migration path to find hidden spread behind baseboards, under cabinets, and inside wall cavities.
Separate clean, gray, and contaminated water incidents because each one changes your response.
Photograph conditions, note elapsed time, and record any odors or discoloration that suggest deeper intrusion.
From there, compare repair scopes and restoration options so you can choose the right next step.
You’re not alone in this process; your team can use these findings to prioritize safety, limit secondary damage, and plan preventive measures that reduce repeat loss and support faster recovery.
Check Moisture Levels
Use a moisture meter to verify what you can’t see, since surface staining alone won’t tell you how far water has moved. You should compare readings across affected and unaffected areas, then map the wet zones with care.
Moisture meters help you spot hidden saturation in drywall, framing, and subfloors before deterioration spreads. Pair those readings with thermal imaging to identify cooler, damp areas that may sit behind finishes or under flooring.
Check at different heights and depths, because water often migrates upward by capillary action or laterally through cavities. Record baseline values for your team, and revisit the same points until levels return to normal.
That disciplined approach helps you stay aligned with the rest of the crew and make confident decisions.
Document Damage for Repairs
Once you’ve verified moisture levels, document every sign of damage before repairs begin. Photograph walls, flooring, insulation, trim, and contents from wide and close angles, and note dates, locations, and affected materials.
Use a moisture meter reading log to connect visible staining with hidden intrusion. Keep copies of receipts, contractor notes, and inspection reports so you can support insurance claims with clear evidence.
Label each image and sketch the room layout to show how water traveled. This record helps your team choose restoration methods that match the damage instead of guessing.
When you share organized documentation, you strengthen coordination, reduce delays, and help everyone on your side move toward repairs with confidence and precision.
Frequently Asked Questions
How Soon Should Professionals Inspect Water Damage After Flooding?
You should inspect water damage within 24 hours of flooding; immediate response limits mold, structural decay, and contamination. You’ll need professional evaluation fast so your team can document losses, prioritize drying, and restore safety.
Can Hidden Mold Develop Before Visible Water Stains Appear?
Yes—hidden mold can develop before visible stains appear. You’ll need to check for moisture retention behind walls, where mold growth thrives in silence; use professional sensors, because your team deserves certainty, not guesswork.
Which Tools Detect Moisture Behind Walls and Under Floors?
You’ll detect hidden moisture with moisture meters and thermal imaging cameras. You can probe walls, baseboards, and subfloors, then verify readings with pin and pinless meters to locate leaks before damage spreads.
Does Homeowner’s Insurance Cover Temporary Relocation Costs?
Usually, yes—your homeowner’s policy may cover temporary relocation costs if a covered loss makes your home uninhabitable. Check your insurance policies for relocation expenses, limits, and documentation requirements, so you’re protected and included.
When Should Damaged Materials Be Removed Instead of Dried?
You remove damaged materials instead of drying them when restoration guidelines show contamination, structural collapse, or saturated material types like drywall, insulation, and carpet padding. You’ll protect your home, health, and recovery timeline.
Review
You can assess water damage with the same precision a detective brings to a crime scene. Use a moisture meter to compare wet and dry areas, then confirm hidden saturation with thermal imaging. Next, photograph every affected surface and record clear notes so you have a reliable repair map. These steps help you identify the full extent of the damage, prioritize remediation, and prevent lingering moisture from becoming a bigger problem later.
Recent Posts
Top 3 Sewage Cleanup Safety Tips
Sewage Cleanup should always begin with safety, as sewage-contaminated water can pose serious health risks.
7 Best Practices for Sewage Cleanup Safety
Sewage Cleanup requires a careful, step-by-step approach to protect your health and prevent further contamination.
10 Best Guidelines for Water Damage Cleanup
Water can race across a floor like a silent spill, slipping into walls and seams